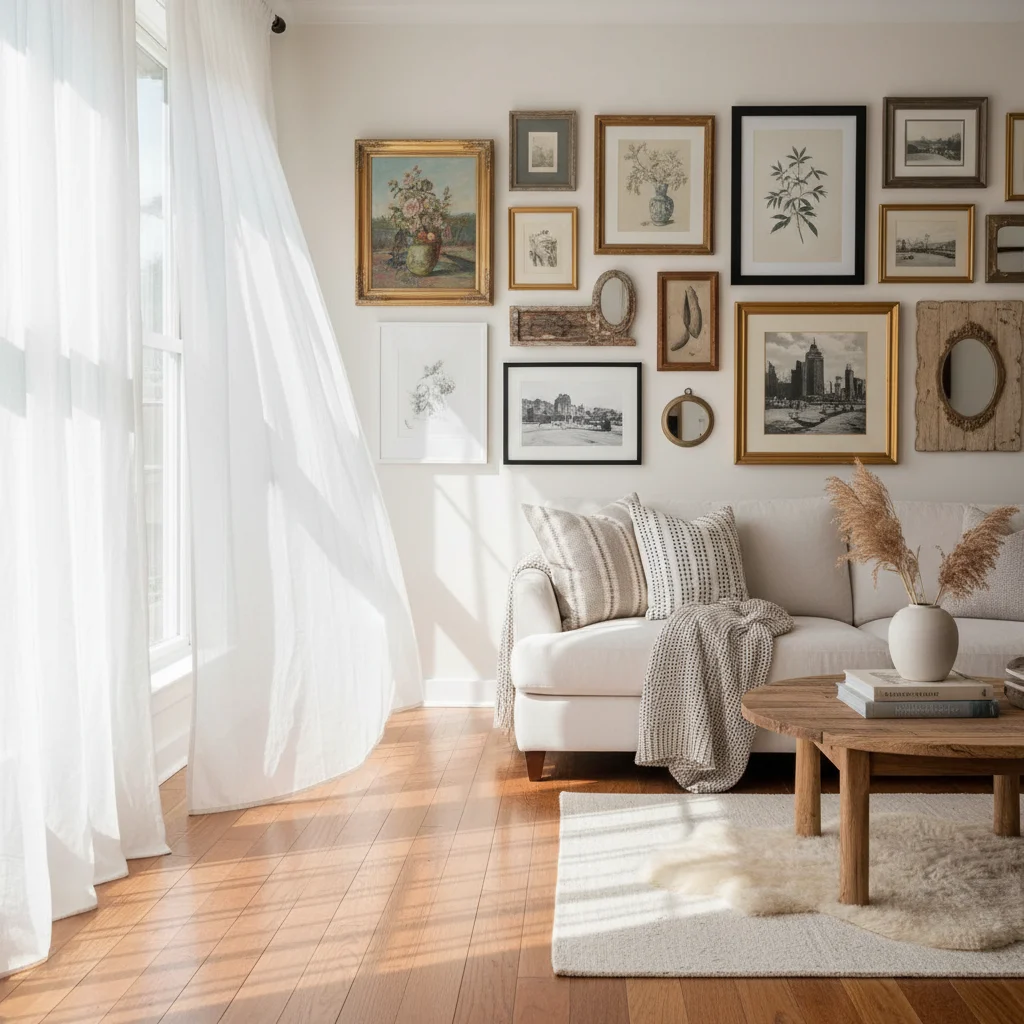
Let’s be honest for a second. We have all been there. You are standing in the middle of your living room, holding a lukewarm cup of coffee, staring at a blank, white wall. It’s vast. It’s imposing. It’s boring. It’s staring back at you, mocking your lack of interior design confidence. You know it needs something. Maybe a mirror? A tapestry? But deep down, you know exactly what you want: a gallery wall.
You have seen them on Pinterest. You have double-tapped them on Instagram. Those perfectly imperfect collections of art, photos, and obscure objects that make a home look effortlessly cool. But then, the panic sets in. You start doing the math. Custom framing costs a fortune. Buying “real” art feels like something only people with trust funds do. Suddenly, that blank wall doesn’t look so bad. Maybe you can just live with the void.
Stop right there. Put down the panic. Creating a stunning gallery wall doesn’t require a degree in art history or a bank account that rivals Elon Musk’s. In fact, the simple joy of art: curating your first gallery wall on a budget is one of the most rewarding DIY projects you can tackle. It is an exercise in creativity, patience, and hunting for treasure. And the best part? We are going to do it without eating instant noodles for the next six months. So, grab a hammer (or some adhesive strips if you are renting) and let’s dive into the messy, beautiful world of wall art.
Step 1: The Vibe Check (and Letting Go of Perfection)
Before you buy a single nail, you need to have a little chat with yourself about the “vibe.” This is the part where most people get stuck because they try to copy a catalog. Do not do that. Your home is not a catalog; it is where you eat tacos in your sweatpants. Your gallery wall should reflect you.
Ask yourself: What do I actually like? Do you gravitate towards moody, black-and-white photography? are you obsessed with botanical prints and vintage flowers? Or are you a chaotic maximalist who loves neon signs mixed with oil paintings of sad clowns? There is no wrong answer here, except maybe the sad clowns—but hey, you do you.
The key to a successful gallery wall is cohesion, not uniformity. You want the pieces to talk to each other, not scream over one another. This could mean sticking to a specific color palette (like earth tones or pastels) or mixing different mediums (photography, sketches, paintings) while keeping the frames similar. Or, if you are feeling spicy, you can mix the frames and keep the art thematically linked. The point is to have a loose plan. Think of it like a dinner party: you want guests who get along, even if they come from different backgrounds.
And please, for the love of drywall, let go of the idea that it has to be perfect instantly. A good gallery wall is organic. It grows. It evolves. You might start with three pieces and end up with twenty over the course of a year. That is part of the charm. It’s a living collection, not a static exhibit.
Step 2: Sourcing Art Without Selling a Kidney

Now for the fun part: finding the stuff. If you search for “fine art prints” online, you might faint at the prices. But we are balling on a budget here, which means we need to get scrappy. Here are my favorite ways to find incredible art for the price of a latte.
The Thrift Store Hustle
If you aren’t scouring your local Goodwill, Salvation Army, or quirky antique shops, you are missing out. Thrift stores are gold mines for gallery walls, but you have to look past the junk. Often, you will find hideous art in amazing frames. Buy the piece just for the frame! You can toss the creepy needlepoint of the weeping child and put something you actually like inside.
Other times, you strike gold. I once found a signed, limited-edition lithograph tucked behind a poster of a boy band from the 90s. It cost me four dollars. The thrill of the hunt is unmatched. Look for old maps, interesting textures, or even vintage mirrors to break up the artwork. Keep an open mind. That weird landscape painting might look super chic once it’s up on the wall next to a modern abstract piece.
The Digital Download Revolution
This is the ultimate cheat code for the budget-conscious decorator. Websites like Etsy are overflowing with artists selling high-resolution digital files of their work for a few bucks. You buy the file, download it, and then print it yourself.
Here is the trick: Do not print these on your sad home printer that is running out of magenta ink. Take the files to a local print shop or use a service like Walgreens or Staples. Ask for matte cardstock or a textured fine art paper if they have it. For five dollars, you can have a print that looks like it cost fifty. It is practically magic. You can find everything from vintage French exhibition posters to modern line drawings.
Unexpected “Art” Objects
Who said art has to be paper inside a frame? Absolutely no one. Some of the most interesting gallery walls incorporate 3D objects. Do you have a cool woven trivet? Hang it up. A vintage license plate? It belongs on the wall. A dried flower bouquet from a special date? Press it and frame it.
Look through your drawers. I have seen people frame beautiful greeting cards, concert tickets, or even a particularly lovely patterned napkin. If it makes you smile, it counts as art. This is also a great way to add sentimental value to your wall. Instead of just pretty pictures, you have memories. A menu from your favorite travel destination looks incredibly sophisticated in a sleek black frame.
DIY: Unleash Your Inner Kindergartener
Okay, hear me out. You can make your own art. You do not need to be Picasso. In fact, abstract art is very forgiving. Buy a large canvas and some acrylic paint. Pick two colors that match your room and just go for it. Big, sweeping brush strokes. Or, try the “spackle art” trend where you use joint compound to create texture on a canvas and paint it white. It looks high-end, adds texture, and costs pennies.
Step 3: The Frame Game

You have your art. Now you need to contain it. Framing is notoriously the most expensive part of this process, but we are going to hack it. We already talked about buying thrift store art just for the frames, but let’s go deeper.
Uniformity vs. Eclectic Chaos: This is a major style decision. If you want a clean, modern look, you might want all matching frames. IKEA and Target are your best friends here. They sell simple, affordable frames in standard sizes. However, if you want that collected, bohemian look, mixing frames is the way to go. Mix wood with gold, black with white, thin metal with chunky ornate plaster.
The Power of the Mat: I cannot stress this enough: matting your art makes it look expensive. A small 4×6 photo inside a huge frame with a wide white mat looks like a museum piece. If you buy a cheap frame that doesn’t come with a mat, you can buy precut mats online for cheap, or even make your own if you are handy with an X-Acto knife. Never underestimate the power of white space around your image. It gives the art room to breathe.
The Spray Paint Hack: Did you find a plastic frame that is the perfect size but a hideous neon green? A can of matte black or gold spray paint is your savior. You can unify a mismatch of thrifted frames by painting them all the same color. It brings immediate cohesion to a disparate collection.
Step 4: The Strategy (Don’t You Dare Just Start Hammering)
This is the part where people ruin their walls. Do not, I repeat, do not just start hammering nails into the wall and hoping for the best. You will end up with a wall that looks like Swiss cheese and art that is crooked. You need a plan. You need a strategy. You need patience.
The Floor Method
Clear a space on your floor that is roughly the size of the wall area you want to fill. Lay out all your framed pieces on the ground. This allows you to move things around, swap positions, and play with the layout without committing to holes in the drywall.
Start with your largest piece. This is your anchor. Place it slightly off-center to keep things interesting, or dead center if you love symmetry. Then, build around it. Think about balance. If you have a dark, heavy frame on the left, you need something visually heavy on the right to balance it out. Mix horizontal and vertical pieces. Leave equal spacing between the frames—usually about 2 to 3 inches is the sweet spot. Too close, and it looks cluttered. Too far apart, and they look like they are floating away from each other.
Take a picture of the layout on your floor. Actually, take three pictures. You will forget which picture went where the moment you pick one up. Trust me on this.
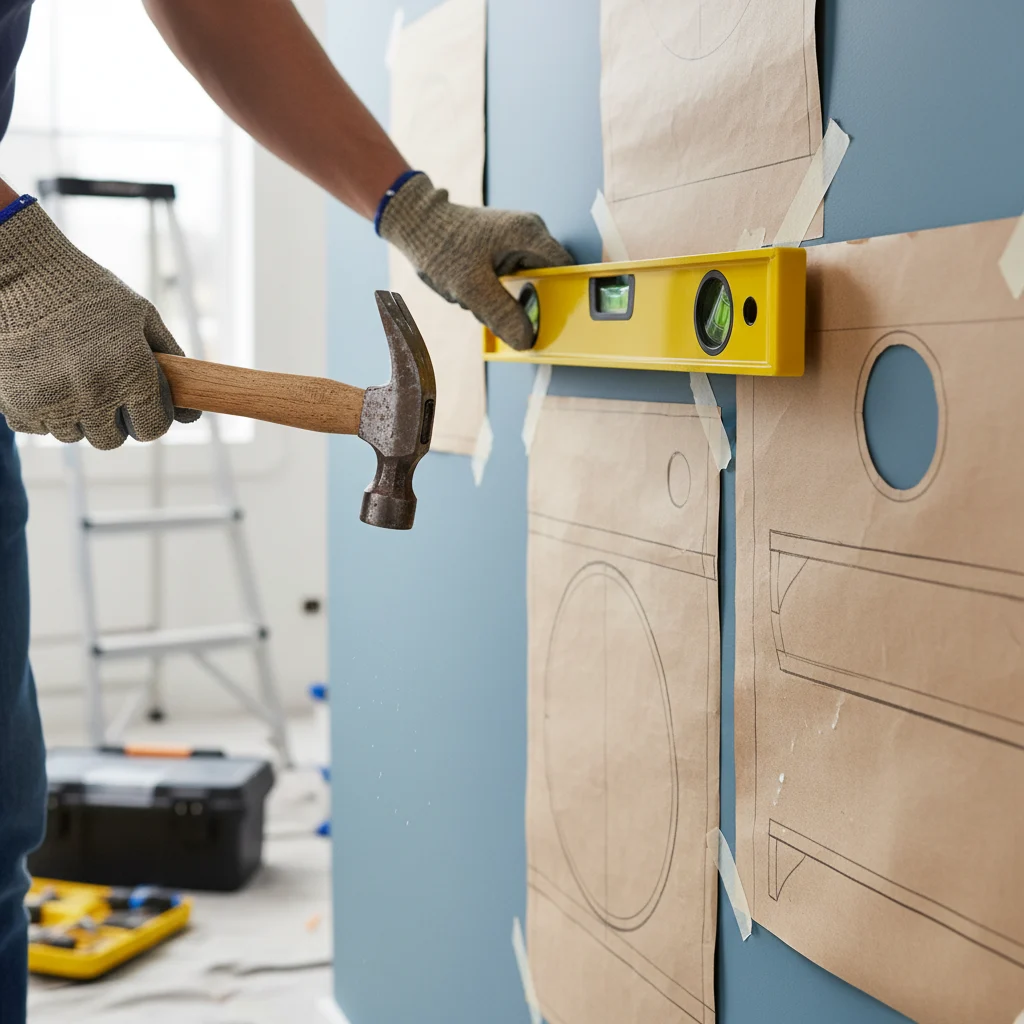
The Kraft Paper Template (The Pro Move)
If you want to be precise—and you should—this step is a game-changer. Get a roll of cheap kraft paper or wrapping paper. Trace every single frame onto the paper and cut out the shapes. Mark on the paper exactly where the nail hook is on the back of the frame.
Now, tape these paper templates onto your wall using painter’s tape (which won’t peel off your paint). You can recreate your floor layout on the wall and see exactly how it fills the space. Step back. Look at it. Is it too high? (Pro tip: Art should be at eye level, not touching the ceiling. The center of the gallery grouping should be about 57 to 60 inches from the floor). Is it centered over the sofa?
Once the paper templates are perfect, you can hammer the nail right through the paper where you marked the hook spot. Rip the paper away, hang the frame, and voilà! Perfect placement on the first try. It feels like magic, but it is just good planning.
Step 5: Hanging Mechanics and Tools

We are in the home stretch. The art is sourced, framed, and planned. Now we hang. But what do we use?
If you own your home and don’t mind patching holes later, good old-fashioned nails and hooks are best for heavier items. Use a stud finder if you are hanging something massive, like a heavy mirror. For standard frames, drywall hooks are usually sufficient.
For the Renters: Command Strips are a gift from the universe. However, you must use them correctly or your art will crash down in the middle of the night and scare the life out of your cat. Clean the wall with rubbing alcohol first. Press the strips firmly for 30 seconds. Wait an hour before hanging the frame. Follow the instructions on the package! They actually work if you don’t cheat the process.
Tools you absolutely need:
1. A Level: Do not eyeball it. Your eyes lie. Your house might even be crooked. Use a small spirit level to ensure every frame is straight.
2. A Pencil: For lightly marking where nails go.
3. A Hammer: Obviously.
4. Patience: Seriously, take a break if you get frustrated.
Also, utilize “bumper pads” or a little roll of tape on the bottom corners of your frames. This keeps them from shifting every time you close a door and keeps them perfectly straight over time.
Step 6: The Final Polish and Lighting
You did it. The frames are up. The paper trash is cleared away. Now, stand back and look at your masterpiece. It changes the whole room, doesn’t it? It adds warmth, personality, and a focal point that wasn’t there before.
But wait, does it look a little flat? Lighting is the secret sauce of galleries. If you have a track light, point a beam toward the wall. If not, consider a picture light (you can buy battery-operated, remote-controlled ones on Amazon that require no wiring) to mount above your centerpiece. It adds a level of sophistication that makes your thrifted finds look like a million bucks.
Finally, accessorize around the wall. Maybe a tall plant stands in the corner, with its leaves reaching up toward the frames. Maybe a low console table sits underneath with a stack of books and a candle. The gallery wall shouldn’t exist in a vacuum; it should interact with the furniture around it.
Conclusion: Embracing the Imperfection
Here is the most important thing I can tell you about your new gallery wall: it doesn’t have to be finished. You might look at it in a week and decide that one print doesn’t fit the vibe anymore. Take it down. Replace it. You might find a weird ceramic mask at a garage sale next month that simply must go up. Add another nail.
The simple joy of art isn’t about creating a museum-perfect display that no one can touch. It is about surrounding yourself with things that spark a memory, a feeling, or just a laugh. It is about taking a blank, scary white wall and saying, “This is my space, and this is what I love.”
So, don’t let the budget scare you. Don’t let the fear of making a hole in the wall stop you. Start small, start cheap, and build a wall that tells your story. And if a frame ends up a little crooked? Well, that’s just character. Now, go find that hammer.